How to Iron a Shirt
For these instructions I assume you are ironing a batch of five (5) 100% cotton dress shirts with an iron setting of five to six (depending on your iron). If you’re seeking a super crisp look, you’ll want to first turn the shirt inside out and iron the inside and then iron the outside of the shirt. This will add another two minutes onto the process, but will give you better results, especially on thicker cotton fabrics. If you use the aluminum foil trick though, you can skip this.
Preparation – Read the shirt’s label. Really, you need to understand what type of fabric the shirt is made from before ironing it or you could possibly destroy it. Most shirts are made from cotton or cotton blends and can withstand high temps, although polyester shirt fabrics are more fragile to heat. If you’re unsure, start with a low setting such as 3 and then move up until the shirt starts to respond to the iron’s heat. Note: Silk and wool shirts are not covered here. Although it is possible to clean them yourself, you need to know what you’re doing.
You want the shirts to be moist (not soaking wet). This will enable you to dry iron without having to worry about your iron’s steam function. Ideally you have recently pulled the shirts from the washing machine; if they are already dry, however, just take them and thoroughly mist them with the spray bottle. Once finished, place them in a plastic bag to better diffuse the moisture and prevent evaporation.
Next set up the ironing board near a power outlet that is close to the closet where you’ll be hanging everything immediately after ironing. Ensure the iron has water in it and then plug it in, set to the lowest heat setting you’ll need. Store all of your ironing equipment together, that way you’re never looking for anything when you need it quickly.
Within 5 minutes the iron should be ready and all the shirts moistened. Pull the lightest weight shirt from the bag first, making sure it is evenly wet. If not, spray on a bit more water.
Iron the Collar First
Always start by ironing your dress shirt collar. This is the most visible part of a shirt as it frames the face, especially when worn with a suit or sport jacket. In a pinch and when wearing a jacket, you can get away with ironing only your collar, the front area right below it, and your cuffs. Just don’t take off your jacket!
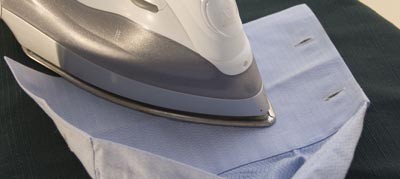
To iron the shirt collar, pop it up and start with the underside, slowly pressing the iron from one point to the other. Ensure that it is thoroughly moist before starting, and if any wrinkles appear, press them to the bottom where they’ll be less visible. Next, flip the shirt over and repeat this process on the outside of the collar.

Next Iron the Cuffs
As mentioned above, I iron the cuffs next as they receive a lot of attention when worn properly with a jacket.
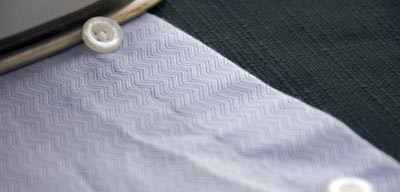
To iron a shirt cuff, first unbutton it (to include the gauntlet button) and lay it out flat. First iron the inside of the cuff, and next the outside, moving all wrinkles from uneven fabric to the edges. Carefully iron around the buttons, and even on the backside. Never iron over buttons (unless you place them over a towel or something with give) as they can leave a mark. For French cuffs, open them fully and iron as above. I recommend you not press the edges of a French cuff–it steals the life and body from a smooth fold.
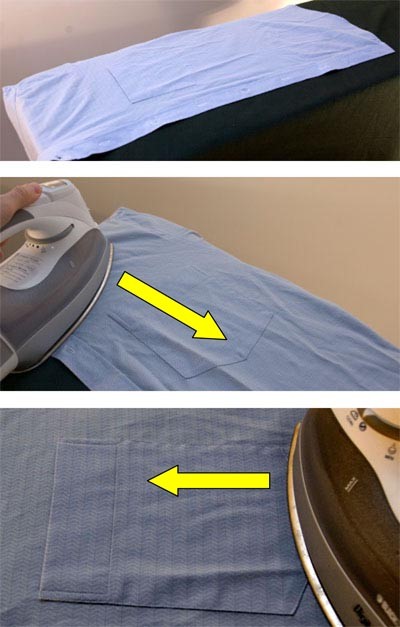
Ironing the Shirt Front
Start with the side that has buttons and carefully work the iron point around the button area (never over the buttons).
iron dress shirt under button close up ironing
Then move back up to the top of the shoulder and work your way down the shirt with the iron. Repeat on the other side, and if you have a placket, press the material under it with the iron point and then over the top. It’s worth spending a bit more time on the front placket and areas near the collar as they receive a high percentage of visual attention.
Iron the Back of the Shirt
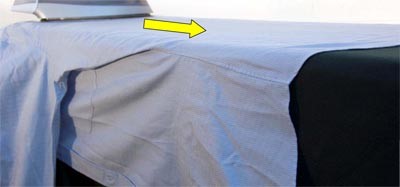
Laying the shirt flat on the board, I like to position one of the sleeve heads into the square edge of the ironing board. You then have half the back in prime position to be ironed, and only need to slide the shirt over to complete the other half. Start at the top with the yoke (back shoulder area) and slowly slide the iron down. If you have a center box pleat, you’ll have to spend a few seconds ironing around it–I prefer not to iron back in the pleat, as the time required for an area you don’t want to highlight isn’t worth the effort.
Iron the Sleeves
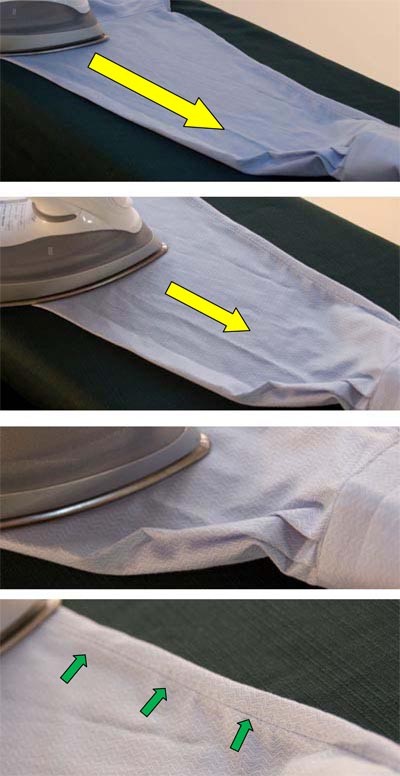
I choose to iron sleeves last as of all the parts of the shirt, they can be ironed in the widest variety of ways and for most men are the trickiest part of the shirt. Problems arise from the fact that unless you have a sleeve board, you’ll be ironing two layers of fabric. Thus the key to ironing sleeves is to be sure the fabric is flat and smooth BEFORE you apply the iron.
Take either sleeve by the seam and lay the whole sleeve (and most of the shirt) flat on the ironing board. If you can see the creases on the top of the sleeve from previous ironing, match it again so that you have a single crease line. Start ironing at the top where the sleeve is sewn onto the shirt and work your way down to the cuff. Turn the sleeve over and iron, then repeat the process with the other sleeve. If you don’t have a sleeve board and would rather your shirt sleeve not have a crease, insert a rolled-up towel into the sleeve. This will allow you to iron it without leaving a crease mark.
Inspect & Hang
Inspect the shirt and spot iron where necessary. Finally, place the shirt on a hanger and in your closet.